- Foreword
- Functions
- How to connect
- How to operate
- Project schematic, PCB layout and firmware
- Pictures of the ATTI

From the top:
My
Yaesu FT-897,
my
homebrewed ATU,
my
Automatic Tuner-Transceiver Interface (ATTI)
and
my
IntelliTune MFJ-993 tuner
This Autoamtic Tuner-Transceiver Interface (ATTI), based on my own firmware and a PIC16F876 processor, is used to control a connected transceiver when the "Tune" button is pressed on an IntelliTune MFJ-993 tuner. The ATTI is developed to transmit CAT data commands and responses to and from transceivers models like Yaesu FT-817, FT-857 and FT-897. Developement for Kenwood an Icom transceivers could come later.
The ATTI does the following functions:
- Communicate with the Yaesu transceiver via CAT commands at the electrical CAT interface.
- Communicate with the IntelliTune MFJ-993 tuner via the simple 3 poled 3.5 mm. stereo jack electrical interface at the tuners rear.
- Automatic activation of a tuning program, including handling of the Yaesu transceiver, when the "Tune" button is pressed once at the front of the IntelliTune MFJ-993 tuner.
- Get information about the operating frequency of the connected Yaesu transceiver.
- Gives a visual red LED and sound alarm, when the "Tune" button is pressed at the IntelliTune MFJ-993 tuner, if the connected Yaesu transceivers operating frequency is above the IntelliTune MFJ-993 tuners range (> 30MHz).
- Does not PTT'ing the transceiver, when the "Tune" button is pressed at the IntelliTune MFJ-993 tuner, if the connected transceivers operating frequency is outside the tuners range (> 30MHz).
- Get information about the operating output power of the connected Yaesu transceiver.
- Gives a visual red LED and sound alarm, when the "Tune" button is pressed at the IntelliTune MFJ-993 tuner, if the connected transceivers output power is above the tuner range (> approx. 16W). To measure the transceivers output power the connected transceiver has to be PTT'ed for a very short while. The PTT'ing is done by the ATTI via CAT commands to the transceiver. If the power output is above the tuners range the transceiver PTT is released immediately.
- Automatically PTT's the connected transceiver, via CAT commands, if the frequency and output power is inside the range described for the IntelliTune MFJ-993 tuner.
- Handles the "TURN ON RADIO" function, inside the IntelliTune MFJ-993 tuner, if the connected Yaesu transceiver is turned off.
- The ATTI is powered by the 13.8V supply inside the CAT connector at the rear of the connected Yaesu transceiver.
The ATTI has two connectors at the rear. One of the connectors connects the ATTI to the IntelliTune MFJ-993 and the other connector connects the ATTI to the connected transceiver. The ATTI is connected to the IntelliTune MFJ-993 via a cable with a 3.5 mm. jack connector at one end and a DB6 connector at the other end. The jack connector is connected to the "Radio Interface" connector at the rear of the IntelliTune MFJ-993 tuner and the DB9 connector is connected to the "MFJ-993" connector at the rear of the ATTI. The ATTI is connected to the transceiver via a cable with a special CAT connector (depends on model) at one end and a DB9 connector at the other end. The CAT connector is connected to the CAT connector at the rear of the transceiver and the DB9 connector is connected to the "Transceiver" connector at the rear of the ATTI.
It is expected that antenna(s), antenna cable, IntelliTune MFJ-993 tuner and used transceiver is connected correct before anything else is done! It is expected that the IntelliTune MFJ-993 tuner is connected to power as described in the tuners manual too.
Turn OFF the power to the IntelliTune MFJ-993 tuner and the transceiver that should be connected to the ATTI. Connect the cables at described in the above section "How to connect".
Turn ON the power to the IntelliTune MFJ-993 tuner and then turn ON the power to the connected transceiver. The ATTI is now ready for use.
Set the connected transceiver to the operating frequency. Push the "Tune" button at the IntelliTune MFJ-993 tuner. If the yellow LED at the ATTI lights up and the connected transceiver begin to transmit in FM mode, when the IntelliTune MFJ-993 tuner is tuning, the ATTI works great. If the IntelliTune MFJ-993 tuner gives an alarm I would refer to the tuners manual. If the ATTI's red LED lights up and an alarm sounds - two things could be wrong: 1) The transceiver is operating at a frequency outside the IntelliTune MFJ-933 tuners frequency range or 2) the transceiver is transmitting with to much power. If 1) then change the frequency to 30MHz or bellow. If 2) then change the output power to a value below approximately 16W.
Project schematic, PCB layout and firmware
- Schematic of the ATTI controller board
- PCB layout of the ATTI controller board
- PCB layout of the ATTI controller board - scaled 1:1
- PCB layout of the ATTI controller board - mirror
- PCB layout of the ATTI controller board - mirror - scaled 1:1
-
Firmware for the ATTI controller
boards PIC16F876 processor ("MFJ-993 Yaesu v1.14.hex" - 2'nd may 2005)
- Link to download the PIC programmer Windows (TM) software "ProgPic2" used in the ATTI project. The link includes a schematic of the AN589 programmer hardware too.
- Link to the PIC programmer schematic of the programmer hardware used in the ATTI project - MicroChip homepage "A PC-Based Development Programmer..." - the AN589 programmer

The firmware programming part of the ATTI-projekt
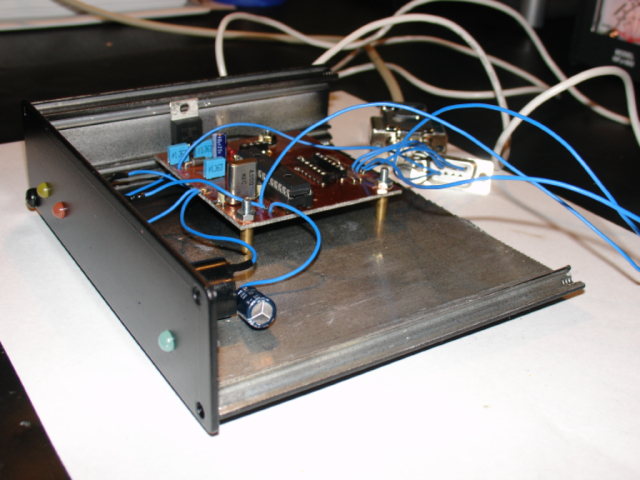
The boxing part of the ATTI-project

The rear of the ATTI

The inputs/outputs to/from the ATTI

The finished ATTI-projeckt at the top of my InelliTune MFJ-993 tuner

Just another picture of the ATTI at the top of my IntelliTune MFJ-993 tuner